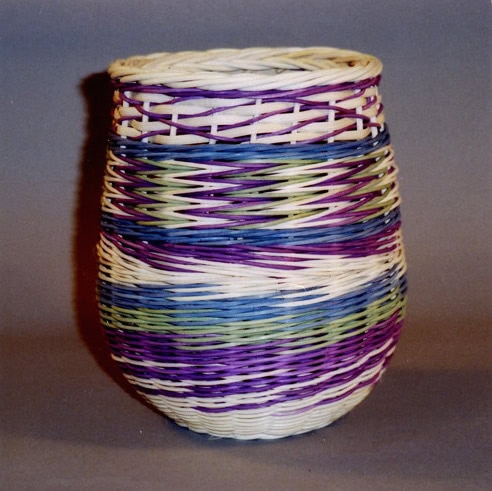
For all level of weavers this colorful reed basket can be made thanks to instructions provided by NBO Lifetime Achievement Award winning basket maker Flo Hoppe.
Three-rod wale is the basic weave for this basket, but the fun comes in when you play around with different colors and number of spokes to create spirals, zigzags, and arrows.
Dimensions
Base: 3 1/2”
Height: 6”
Diameter: 4 1/2”
Materials
Spokes: 4 Reed for base and sides—2 oz.
Weavers:
2 reed for base and sides – 4 oz.
3/16” flat oval reed- 2 yards
Preparation
Spokes: From #4 reed, cut 10 spokes, each 40” long, and 1 spoke, 14” long
Dye: #2 reed – 2 oz. each. Colors A, B and C
Instructions
The first part of this pattern is an outline format to give an overview of the basket. The following sections give more detailed explanations of the techniques.
Base
Weave a 5-over-5 overlaid base with Japanese weave (over two, under one) with natural No. 2 weavers to a diameter of 3 1/4.”
Sides
Upsetting: Pinch spokes. Work a 4-rod coil with No. 3 reed.
Weaving Sequence for Sides
6 rows 3-rod wale with natural No.2 weavers. The sides are woven entirely of 3-rod wale except for the top wale weave section.
Spiral:
- At spoke 1, change natural weaver to color A and weave 4 rows.
- At spoke 1, change a second natural weaver to color A and weave 4 more rows.
- At spoke 1, change a third natural weaver to color A and weave 2 rows.
Zigzags:
- For the next 3 rows,change the color A weaver to color B at a spoke.
- For the next 3 rows, change the color B weaver to color C at spoke 1.
- For the next 3 rows,change the color C weaver to a natural weaver at spoke 1.
- Cut off all three weavers at their respective beginning spokes.
Arrow:
- Weave 3-rod wale to the left – place the three natural weavers behind spoke 1 and the two spokes to the left.
- Weave one row of 3-rod wale and change to color A at spoke 1.
- For the next two rows, change to color A at spoke 1.
- Weave one complete row of 3-rod wale with color A.
- Cut off all the weavers at their respective beginning spokes.
Adding a spoke:
- Add a spoke by inserting a 12″ No.·4 spoke· alongside an existing spoke to make an uneven number of spokes.
- Work two rows of 3-rod wale with color C to separate the added spoke. Work a step-up at the end of each row.
- Cut off the weavers at their respective beginning spokes.
Three-rod arrow-chasing weave:
- Work 3-rod arrow chasing weave for 8 rows with two color A weavers, two color B weavers, and two natural weavers. This makes 4 complete arrows.
- Work two rows of 3-rod wale with color C with a step-up at the end of each row.
Wave Weave:
- With a natural 3/16″ flat oval weaver and a color A weaver, work 4 rows of wave weave.
- Work one row of 3-rod wale with color A weavers. End with a step-up.
Border: 3-row rolled border
- Row 1: Behind one and out
- Row 2: In front of two and in
- Row 3: Over two and down on the inside
BASE
Weave a 5-over-5 overlaid base with Japanese weave (over two, under one) with natural No. 2 weavers to a diameter of 3 1/4″.
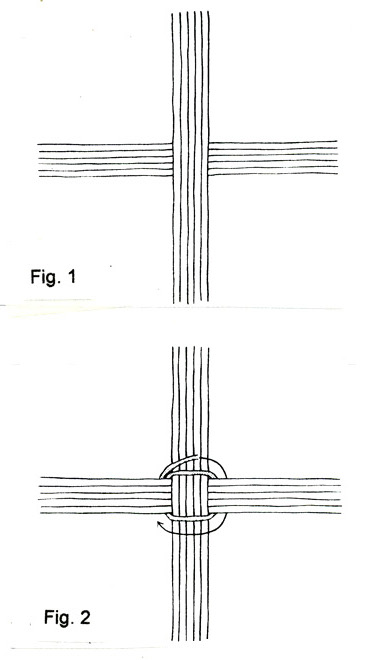
To begin, soak the ten No.4-spokes and several long strands of No. 2 reed in warm water for several minutes. Hold the center of one group of five spokes horizontally in your left hand and place the center of the other group of five spokes vertically on top of it (Fig. 1). Hold these two groups in the upper left corner with your left hand. Place the end of a long flexible No. 2 weaver behind the horizontal group in the upper left corner and hold the end tight with your left hand. Weave in a clockwise direction, going over the top group of five, under the bottom group, and so on around (Fig. 2).
The first row of weaving that ties in the Slath must be very snug, but not so tight that the spokes start bunching up. If this first row isn’t tight enough, the spokes will shift and pull out when you try to separate them with Japanese weave. Weave the over-five, under-five pattern for four rows, keeping the rows very close together.
Separating the spokes.
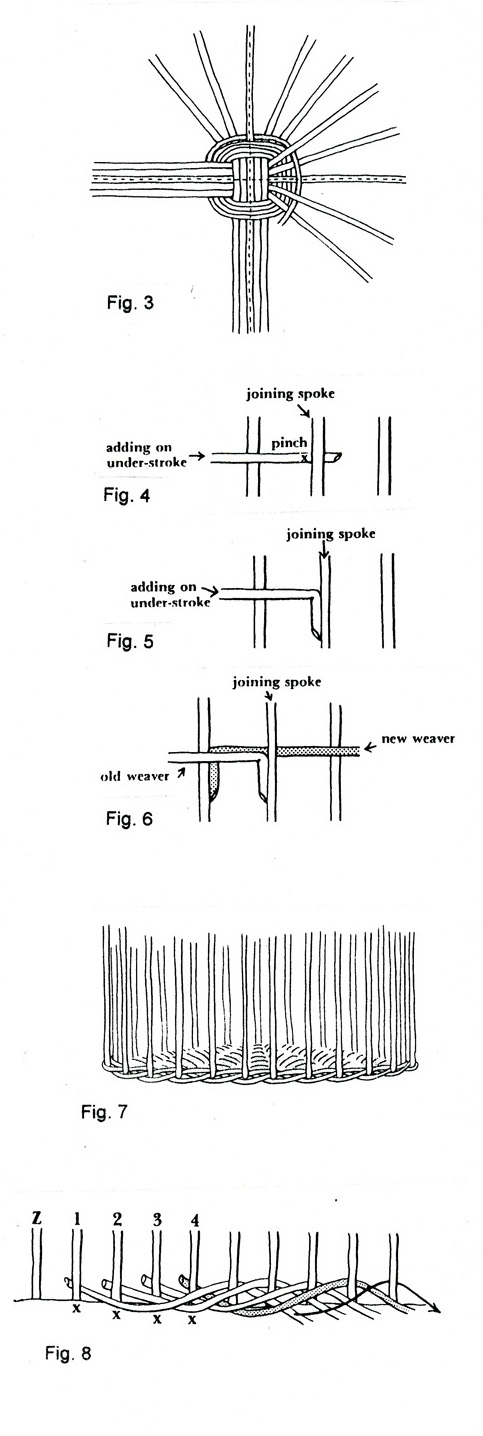
After four rows of tying in the slath are completed, begin separating the spokes with Japanese weave (over two, under one} starting at the top group of five spokes (Fig. 3). Weave a row or two to hold the short end in place, then, either trim it off close to the underside of the base or run the end under the four rows of weaving to secure it before trimming.
Adding a new weaver with Japanese-weave
To add a new weaver with Japanese weave, use the hidden join. End the old weaver behind the joining spoke. Trim the old weaver so that you can see 1/4″ to the right of the joining spoke (Fig. 4). Pinch the old weaver to the left of the joining spoke and thread it down into the weaving (Fig. 5). Pinch a new weaver 1/4″ from the end and thread it down along the right side of the previous spoke. Bring the new weaver behind the joining spoke and continue with Japanese weave (Fig. 6).
UPSETTING
Soak the base and the side spokes close to the base in preparation for upsetting the basket Hold the basket so the underside is facing you and, with your needle nose pliers held parallel to the base, pinch the spokes close to the weaving. Pinch, remove the pliers, then slowly and carefully with your fingers, push the spokes away from you.
Fig. 7 shows the base spokes pinched and turned up ready for the 4-rod coil. The coil will cover the bend in the spokes and make a “foot” for the basket to stand on.
4-Rod Coil
Insert four natural No. 3 weavers behind four consecutive spokes. To weave the coil, bring the left weaver in front of three spokes, over the other three weavers, behind the fourth spoke, and out (Fig. 8). Continue this sequence all the way around, always bringing the left weaver over three weavers, under one, and out. End the row with the weavers coming from behind spokes W, X, Y, and Z (Fig. 9).
The coil is finished with a step-up and lock. Bring weaver A in front of spokes 1, 2 and 3, behind spoke 4, and slip the final end between the beginning and the spoke, running it down through the underside of the base (Fig. 9). Do the same with each of the other weavers, working from right to left. The ends must lay parallel to each other as you look at the basket from the side. They are bracing against each other, not leaning against a spoke. Trim the ends on a slant close to the weaving both inside and out.
SIDES
Weaving sequence for the sides:
6 rows 3-rod wale with natural No. 2 weavers. The sides are woven entirely of 3-rod wale except for the top wave weave section.
Spiral:
- At spoke 1, change natural weaver to color A and weave 4 rows.
- At spoke 1, change a second natural weaver to color A and weave 4 more rows.
- At spoke 1, change a third natural weaver to color A and weave 2 rows.
Zigzags:
- For the next 3 rows, change the color A weaver to color B at spoke 1.
- For the next 3 rows, change the color B weaver to color C at spoke 1.
- For the next 3 rows, change the color C weaver to a natural weaver at spoke 1.
- Cut off all three weavers at their respective beginning spokes.
Arrow:
- Weave 3-rod wale to the left – place the three natural weavers behind spoke 1 and the two spokes to the left.
- Weave one row of 3-rod wale and change to color A at spoke 1.
- For the next two rows, change to color A at spoke 1.
- Weave one complete row of 3-rod wale with color A.
- Cut off all the weavers at their respective beginning spokes.
Adding a Spoke:
- Add a spoke by inserting a 12″ No. 4 spoke alongside an existing spoke to make an uneven number of spokes.
- Work two rows of 3-rod wale with color C to separate the added spoke. Work a step-up at the end of each row.
- Cut off the weavers at their respective beginning spokes.
Three Rod Arrow Chasing Weave:
- Work 3-rod arrow chasing weave for 8 rows with two color A weavers, two color B weavers, and two natural weavers. This makes 4 complete arrows.
- Work two rows of 3-rod wale with color C with a step-up at the end of each row.
Wave Weave:
- With a natural 3/16″ flat oval weaver and a color A weaver, work 4 rows of wave weave.
- Work one row of 3-rod wale with color A weavers. End with a step-up.
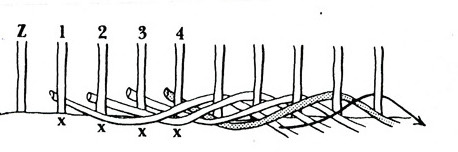
Fig. 9
3-Rod Wale
For the spiral, zigzag, and arrow patterns, the 3-rod wale is done continuously in a spiraling manner to accommodate the color patterning. There won’t be any step-ups.
- To begin 3-rod wale, mark three consecutive spokes with twist ties, then place natural No. 2 weavers behind each of these three spokes.
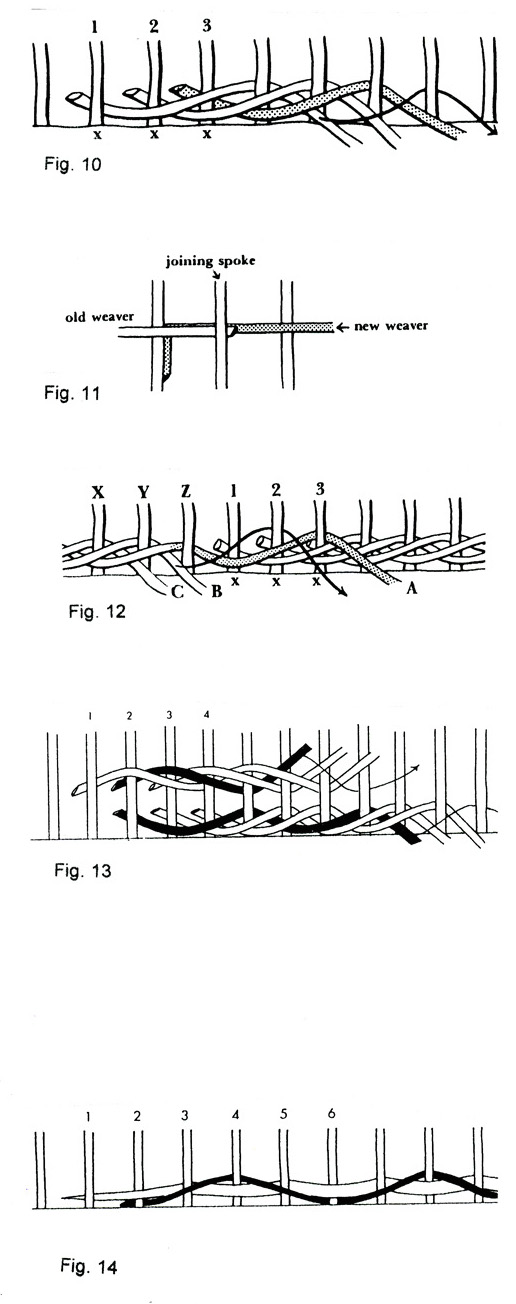
- Bring the left weaver in front of two spokes to the right, over the other two weavers, behind the next spoke, and out (Fig. 10). Continue this sequence all the way around, always taking the left weaver over the other two, behind the third spoke, and out.
Adding a New Weaver with 3-Rod Wale
3-rod wale, use the combined join (Fig. 11 ).
- End the old weaver behind the joining spoke.
- Trim the old weaver so that you can see 1/4” to the right of· the joining-spoke.
- Pinch a new weaver 1/4″ from the end and thread it down along the right side of the previous spoke.
- Bring the new weaver behind the joining spoke on top of the old weaver.
Step-Up
The two rows of 3-rod wale below and above the 3-row arrow chasing weave section are worked with a step-up at the end of each row.
- End the first row of 3-rod wale with the weavers coming from behind spokes X, Y, and Z (Fig. 12).
- To do the step-up, bring the right weaver (A) in front of spokes 1 and 2, behind 3; and out (Fig. 12).
- Next, bring weaver B in front of spokes 2 and 1, behind spoke 2, and out.
- Last, bring weaver C in front of spokes Y and Z, behind 1, and out.
3-Rod Arrow Chasing Weave
- Begin by marking four consecutive spokes with twist-ties. Start the first row by inserting three weavers (color A, color B, and natural) behind spokes 2, 3 and 4 (Fig. 13).
- Weave a row of regular waling to within two spokes of spoke 1. Insert three more weavers to be used for the second row behind spokes 1, 2 and 3 (natural, color A , color B). Make sure the same colors are an top of each other). Weave the reverse waling row to within two spokes of the first set of weaver, drop the reverse set, and weave a row of regular waling with the first set.
- To keep track of which row is doing what, remember that regular waling slants upward to the right, and reverse waling slants upward to the left. There is another way of looking at it: If the left weaver is coming from below the other weavers, weave regular waling. If the left weaver is on top of the other weavers, weave reverse waling.
- End the band of arrow weaving with a row of reverse waling. The ends of the weavers used for regular waling will finish behind spokes 2, 3 and 4. The ends of the weavers used for reverse waling will end behind spokes 1, 2 and 3.
Wave Weave
- Taper the end of a 3/16″ flat oval weaver .for .about 4”. Place it behind spoke 1 and weave in front of spoke 2, behind spoke 3, in front of spoke 4, behind spoke 5, and out.
- Place the dyed No. 2 weaver behind spoke 2, below the flat oval weaver, bring it diagonally up across spoke 3, behind spoke 4 above the flat oval weaver, diagonally down across spoke 5, behind spoke 6, below the flat oval weaver, and out (Fig. 14). Repeat this sequence for three rows. Taper the final end of the flat oval weaver for the same number of inches as you did at the beginning. End it behind spoke 5. End the round weaver behind spoke 4.
BORDER
Soak the spokes very well and pinch them close to the weaving, holding the needlenose pliers perpendicular to the basket.
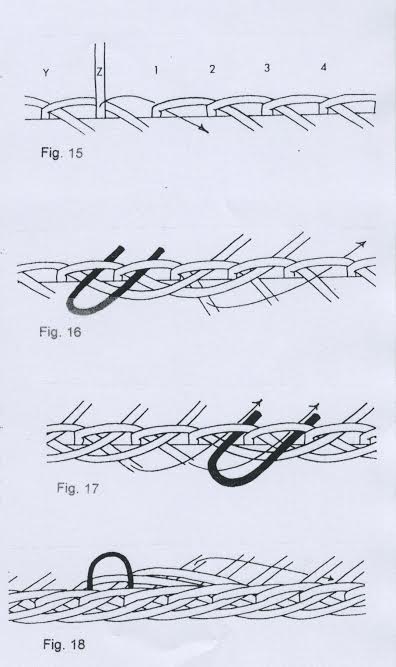
Row 1: Behind one and out.
Working to the right, take each spoke, in turn, behind the next spoke and out (Fig. 15): To-end; lift up the first loop formed by the first spoke turndown, and bring the last standing spoke through the first loop from the inside to the outside.
Row. 2: In front of two and in.
Place a hairpin marker in the spaces to the right of any two consecutive spokes, as shown in Fig. 16. Beginning with the spoke nearest the left end of the hairpin marker, bring each spoke, in turn, in front of the two spokes to the right, over the two spokes that are sticking out to the front, then to the inside, going under the loop formed by the first row. Continue this sequence – in front of two and in – all the way around until there are two unworked spokes left. To end, pull the first two spokes out a couple of inches and hold them down. Insert the last two spokes, following the spaces indicated by the hairpin marker (Fig. 17). The second to the last spoke goes in the space of the first marker; the last spoke goes in the space of the second marker.
Row 3: Over two and down.
Work from the side closest to you as you look down into the basket. Place a hairpin marker to the right of each of any two consecutive spokes (Fig. 18). Pick up the next spoke to the right and bring the first spoke over the second and the third, then down under the fourth spoke. Keep this row close to the last row of weaving. Continue this sequence – over two and down – all the way around until there are two unworked spokes left. The next-to-last spoke goes in the space of the first marker and the last spoke goes into the space of the second marker (Fig: 18).